Create Campaign - CRM05.1P1US5.1
1. Problem Statement
User Roles Identified:
- Marketing Manager: Responsible for creating and executing marketing campaigns to drive business objectives
- Campaign Specialist: Manages day-to-day campaign operations and optimization
Pain Points:
Marketing Manager:
- Difficulty in selecting appropriate campaign types for different business objectives
- Lack of guided workflow to ensure all campaign elements are properly configured
- Complex audience segmentation process without clear geographical distribution visibility
- Time-consuming campaign setup process with multiple disconnected steps
- Inability to preview and validate campaign configuration before launch
Campaign Specialist:
- Manual campaign creation process prone to errors and omissions
- Limited template options requiring custom workflow creation from scratch
- Complex scheduling configuration with multiple timezone and timing considerations
- Difficulty in coordinating campaign elements across different channels
- Lack of standardized campaign review process before execution
Core Problem:
The current campaign creation process is fragmented, manual, and lacks proper guidance, leading to inefficient campaign setup, potential configuration errors, and delayed time-to-market for marketing initiatives.
2. Who Are the Users Facing the Problem?
Marketing Manager
- Senior-level marketing professional responsible for strategic campaign planning
- Needs access to campaign goal selection, audience targeting, and performance review capabilities
- Requires comprehensive campaign oversight and approval functionality
Campaign Specialist
- Mid-level marketing professional responsible for tactical campaign execution
- Needs access to detailed campaign configuration, template management, and workflow building
- Requires hands-on campaign setup and optimization capabilities
3. Jobs To Be Done
For Marketing Manager: When I need to create targeted marketing campaigns to achieve specific business objectives, But I struggle with selecting appropriate campaign types and ensuring proper audience targeting without clear guidance, Help me choose the right campaign approach with guided workflows and audience visualization, So that I can launch effective campaigns that drive measurable business results.
For Campaign Specialist: When I need to execute campaign setups efficiently using proven templates and workflows, But I face time-consuming manual configuration processes and lack standardized templates, Help me access pre-built campaign templates and streamlined configuration tools, So that I can reduce setup time and minimize configuration errors while maintaining campaign quality.
4. Solution
The CRM Campaign Creation solution provides a comprehensive 5-step guided workflow that streamlines the entire campaign creation process from initial goal selection to final review and launch.
Key Capability Areas:
Campaign Goal Intelligence
- Smart campaign goal selection with predefined templates
- Goal-based workflow recommendations
- Campaign type suggestions based on objectives
Audience Management & Segmentation
- Visual audience selection with contact counts
- Geographical distribution mapping
- Real-time audience size calculation
- Multi-segment targeting capabilities
Template & Workflow Management
- Pre-built campaign templates library
- Custom workflow builder with drag-and-drop functionality
- Template categorization by campaign type and industry
Advanced Scheduling & Timing
- Flexible campaign timeline configuration
- Timezone-aware scheduling
- Budget allocation and tracking
- Send time optimization features
Campaign Review & Validation
- Comprehensive pre-launch review dashboard
- Configuration validation and error checking
- Campaign summary with key metrics preview
- Approval workflow integration
Multi-Channel Integration
- Email campaign configuration
- LinkedIn outreach capabilities
- Cross-channel workflow coordination
Analytics & Performance Tracking
- Campaign performance monitoring
- Audience engagement analytics
- ROI tracking and reporting
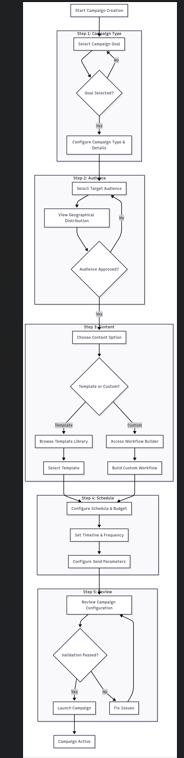
5. Major Steps Involved
Step 1: Campaign Goal Selection & Type Configuration
Step 2: Audience Selection & Targeting
- Audience Selection Interface: View "Select Target Segments" section
- Review Available Segments:
- Enterprise Prospects (245 contacts, North America)
- Newsletter Subscribers (1250 contacts, Global)
- Event Attendees (89 contacts, Europe)
- Product Trial Users (156 contacts, Asia Pacific)
- Select Target Segments:
- Check checkbox for "Newsletter Subscribers"
- Check checkbox for "Product Trial Users"
- View real-time total audience calculation: "Total Audience: 1406 contacts"
- Geographic Validation:
- View "Geographical Distribution" map on right side
- Confirm audience distribution shows Global and Asia Pacific regions
- Verify audience concentration aligns with campaign objectives
- Final Audience Review: Confirm total contact count meets campaign requirements
- Proceed: Click "Next" button to advance to Step 3
Step 3: Content & Workflow Configuration
- Content Selection Method: Choose between three tabs - "Templates", "Workflow", "My Workflows"
- Browse Templates: Click "Templates" tab to view pre-built options
- Template Review:
- Scroll through available templates (Cold Email Campaign, B2B Sales Funnel, Lead Nurturing Series, etc.)
- Click "Lead Nurturing Series" template card
- Review template details: "Marketing, 10 nodes"
- Read workflow preview: "Contact Form → Educational Email → Wait 7 days → Case Study"
- Template Selection: Click "Use Template" button
- Template Configuration (if customization needed):
- System may redirect to workflow builder for modifications
- Review workflow nodes and connections
- Modify timing, content, or decision points as needed
- Proceed: Click "Next" button to advance to Step 4
Step 4: Schedule & Budget Configuration
- Campaign Timeline Setup:
- Start Date: Click calendar picker, select date 3 days from current date
- End Date: Click calendar picker, select date 45 days from start date
- Review frequency note: "Often scheduled around marketing campaigns or seasons"
- Budget Configuration:
- Enter "$2500" in Campaign Budget field
- Review budget inclusion note about email sending, design, content, and promotional offers
- Timezone & Schedule Settings:
- Campaign Timezone: Select "UTC (Coordinated Universal Time)" from dropdown
- Max Emails Per Hour: Enter "500" (reduced from default 1000)
- Check "Limit emails on send overwhelming recipients" checkbox
- Send Time Optimization:
- Check "Enable Optimal Send Times" checkbox
- Review explanation: "Send emails when your audience is most engaged"
- Check "AI-Powered Send Time Optimization" for enhanced delivery
- Weekly Exclusions:
- Exclude Weekdays: Check boxes for "Saturday" and "Sunday"
- Leave weekdays unchecked for business audience targeting
- Email Configuration:
- Sending Email Address: Select "noreply@company.com" from dropdown
- Choose "Primary" sender type
- Check "Enable Send Throttling" for delivery rate control
- Proceed: Click "Next" button to advance to Step 5
Step 5: Review & Launch
- Campaign Review Dashboard: Review "Review Your Campaign" summary page
- Campaign Intent Verification:
- Goal: Confirm displays "Nurture leads and prospects"
- Verify goal description matches original selection
- Campaign Overview Validation:
- Name: Verify "Q1 2025 Lead Nurturing" displays correctly
- Type: Confirm "Promotional" campaign type
- Funnel Target: Verify selected funnel stage
- Description: Review campaign description or "No description" status
- Target Audience Confirmation:
- Segments: Verify "Newsletter Subscribers, Product Trial Users"
- Total Contacts: Confirm "1406" contact count with green checkmark
- Workflow Configuration Review:
- Workflow Nodes: Verify "10 nodes" from Lead Nurturing template
- Workflow Paths: Check "Multiple connections" status
- Review any workflow warnings (e.g., "No workflow configured" alert)
- Schedule & Budget Validation:
- Start Date: Confirm selected start date displays correctly
- End Date: Confirm selected end date displays correctly
- Budget: Verify "$2500" budget amount
- Timezone: Confirm "UTC" timezone setting
- Sending Email: Verify "noreply@company.com" sender address
- Final Validation: Review any error messages or warnings that need resolution
- Campaign Launch Decision:
- Save as Draft: Click "Previous" if changes needed, system saves progress
- Launch Campaign: Click green "Create Campaign" button to go live
- Confirmation: System displays success message and redirects to campaign management
Post-Condition: Campaign is successfully created and active, with all stakeholders notified and campaign tracking initiated.
Alternative Flows:
Custom Workflow Creation (Step 3 Alternative):
- Select "Start from Scratch" in content section
- Access Campaign Workflow Builder
- Drag nodes from sidebar: Triggers → Channels → Conditions
- Configure each node with specific parameters
- Connect nodes to create logical workflow path
- Test workflow logic and timing
- Save as custom workflow for future use
My Workflows Usage (Step 3 Alternative):
- Click "My Workflows" tab
- Browse saved workflows (e.g., "linkedin" workflow with "1 nodes, 0 connections")
- Select existing workflow
- Click "Load" button to import workflow
- Modify loaded workflow as needed
- Proceed with loaded/modified workflow
Draft Management Flow:
- At any step, user can navigate away without completing
- System auto-saves progress as draft
- User can return to "My Campaigns" to continue draft
- Draft shows completion percentage and last modified timestamp
- User can resume from last completed step
6. Flow Diagram
7. Business Rules
Step 1: Campaign Goal Selection
"Back to Campaigns" Button
- Function: Returns user to main campaigns list page
- State Management: If campaign data exists, prompts user to save as draft
- Navigation Rule: Available from all steps in campaign creation
Campaign Goal Cards
- Total Options: Exactly 6 goal options must be displayed
- Selection Behavior: Single selection only, radio button functionality
- Visual Feedback: Selected card shows highlighted border
- Required Field: User cannot proceed without selecting a goal
Goal Option 1: "Launch a new product or feature"
- Icon: Rocket icon displayed
- Description: "Announce and promote a new product, service, or feature to your audience"
- Suggested Campaign Type: "Promotional"
- Auto-population: When selected, Campaign Type field defaults to "Promotional Emails"
Goal Option 2: "Nurture leads and prospects"
- Icon: People/users icon displayed
- Description: "Build relationships with potential customers through educational content"
- Suggested Campaign Type: "Drip"
- Auto-population: When selected, Campaign Type field defaults to "Drip Campaign"
Goal Option 3: "Retain existing customers"
- Icon: Heart icon displayed
- Description: "Keep current customers engaged and prevent churn"
- Suggested Campaign Type: "Reengagement"
- Auto-population: When selected, Campaign Type field suggests retention-focused templates
Goal Option 4: "Promote an event or webinar"
- Icon: Calendar icon displayed
- Description: "Drive attendance and engagement for upcoming events"
- Suggested Campaign Type: "Event"
- Auto-population: When selected, Campaign Type field defaults to "Event Promotion"
Goal Option 5: "Share valuable content"
- Icon: Document icon displayed
- Description: "Distribute educational content, newsletters, or industry insights"
- Suggested Campaign Type: "Newsletter"
- Auto-population: When selected, Campaign Type field defaults to "Content Distribution"
Goal Option 6: "Something else"
- Icon: Question mark icon displayed
- Description: "I have a different goal in mind"
- Suggested Campaign Type: "Promotional"
- Behavior: Opens free text field for custom goal description
Step 2: Campaign Type Configuration
Progress Indicator
- Step 1 Indicator: Shows green checkmark when completed
- Step 2 Indicator: Shows blue highlight when active
- Step Navigation: Users can click completed steps to return and modify
Campaign Name Field
- Field Type: Text input, required field
- Placeholder Text: "e.g., Spring Product Launch"
- Character Limit: 3-100 characters
- Validation:
- Cannot be empty
- Must be unique within user's campaign list
- Cannot contain special characters: < > " ' &
- Help Text: "Use clear, action-oriented names. Examples: Flash sale, Product launches"
Campaign Type Dropdown
- Field Type: Single-select dropdown, required field
- Default Value: Auto-populated based on goal selection from Step 1
- Options Available:
- Promotional Emails
- Drip Campaign
- Event Promotion
- Newsletter Campaign
- Reengagement Campaign
- Custom Campaign
- Behavior: Selection changes available funnel target options and best practices display
Campaign Type Information Panel
- Trigger: Displays when campaign type is selected
- Content: Shows "About this campaign type" information
- Dynamic Text: Changes based on selected campaign type
- Examples Section: Provides specific use cases (Flash sales, Product launches, Discount codes, Seasonal offers)
- Frequency Guidance: Shows recommended frequency and best practices
- Close Behavior: Panel can be dismissed but reappears on type change
Funnel Target Dropdown
- Field Type: Single-select dropdown, required field
- Label: "Select funnel stage"
- Options:
- Top: Brand awareness, Middle: Marketing, Bottom: Sales conversion
- Help Text: "Top: Brand awareness, Middle: Nurturing, Bottom: Sales conversion"
- Dependency: Available options may change based on campaign type selection
Campaign Description Field
- Field Type: Multi-line text area, optional field
- Placeholder Text: "Describe your campaign goals and strategy..."
- Character Limit: 500 characters
- Counter Display: Shows character count (e.g., "245/500")
- Help Text: "Best practices: Create urgency, Clear call-to-action"
Previous Button
- Function: Returns to Step 1 (Goal Selection)
- State Management: Saves current form data as draft
- Validation: No validation required for backward navigation
Next Button
- Function: Proceeds to Step 3 (Audience Selection)
- Validation Requirements:
- Campaign Name must be filled
- Campaign Type must be selected
- Funnel Target must be selected
- Error Display: Shows field-specific error messages for missing required fields
- State Management: Saves all form data before proceeding
Step 3: Audience Selection
Select Target Segments Section
Segment Option 1: Enterprise Prospects
- Contact Count: Displays "245" contacts
- Geographic Info: "North America" region identifier
- Checkbox: Multi-select capability
- Selection Behavior: Adds to total audience count when checked
Segment Option 2: Newsletter Subscribers
- Contact Count: Displays "1250" contacts
- Geographic Info: "Global" region identifier
- Checkbox: Multi-select capability
- Selection Behavior: Adds to total audience count when checked
Segment Option 3: Event Attendees
- Contact Count: Displays "89" contacts
- Geographic Info: "Europe" region identifier
- Checkbox: Multi-select capability
- Selection Behavior: Adds to total audience count when checked
Segment Option 4: Product Trial Users
- Contact Count: Displays "156" contacts
- Geographic Info: "Asia Pacific" region identifier
- Checkbox: Multi-select capability
- Selection Behavior: Adds to total audience count when checked
Total Audience Counter
- Display Format: "Total Audience: X contacts"
- Calculation: Real-time sum of all selected segments
- Update Behavior: Automatically recalculates when segments are selected/deselected
- Minimum Validation: Must be greater than 0 to proceed
- Warning Display: Shows warning if total exceeds 10,000 contacts
Geographical Distribution Panel
- Default State: Shows placeholder text "Select segments to see geographical distribution"
- Active State: Displays interactive map when segments are selected
- Map Functionality: Shows geographic distribution of selected audience
- Region Highlighting: Highlights regions based on selected segments
- Data Source: Pulls geographic data from contact records in selected segments
Previous Button
- Function: Returns to Step 2 (Campaign Type Configuration)
- State Management: Preserves audience selections as draft
- Validation: No validation required for backward navigation
Next Button
- Function: Proceeds to Step 4 (Content Configuration)
- Validation Requirements: At least one segment must be selected
- Error Display: Shows "Please select at least one audience segment" if none selected
- Minimum Audience: Validates minimum 10 contacts are selected
Step 4: Content Configuration
Content Selection Tabs
Templates Tab
- Function: Displays pre-built campaign templates
- Default State: Active tab when step loads
- Content: Shows template library with categorized options
Workflow Tab
- Function: Access to workflow builder for custom campaign creation
- Redirect Behavior: Opens Campaign Workflow Builder interface
- State Management: Saves current campaign data before redirect
My Workflows Tab
- Function: Displays user's saved custom workflows
- Content: Shows previously created and saved workflows
- Load Functionality: Allows importing of saved workflows
Template Library (Templates Tab Active)
Cold Email Campaign for Sales Template
- Category: Sales
- Node Count: "5 nodes" displayed
- Description: "Automated cold email sequence with follow-ups and engagement tracking"
- Workflow Preview: "Email Send → Wait 3 days → Email Opened? → Follow-up Email"
- Use Template Button: Loads template configuration into campaign
Simple B2B Sales Funnel Template
- Category: Sales
- Node Count: "12 nodes" displayed
- Description: "Lead qualification and nurturing workflow for B2B prospects"
- Workflow Preview: "Newsletter Signup → Welcome Email → Demo Booking"
- Use Template Button: Loads template configuration into campaign
Lead Nurturing Series Template
- Category: Marketing
- Node Count: "10 nodes" displayed
- Description: "Multi-touch nurturing campaign to convert leads into customers"
- Workflow Preview: "Contact Form → Educational Email → Wait 7 days → Case Study"
- Use Template Button: Loads template configuration into campaign
Webinar Promotion Template
- Category: Events
- Node Count: "15 nodes" displayed
- Description: "Complete webinar promotion and follow-up automation"
- Workflow Preview: "Registration → Reminder Emails → Webinar Day → Follow-up"
- Use Template Button: Loads template configuration into campaign
Product Launch Template
- Category: Product
- Node Count: "16 nodes" displayed
- Description: "Comprehensive product launch campaign with multi-channel approach"
- Workflow Preview: "Announcement → Email Series → Social Media → Launch Day"
- Use Template Button: Loads template configuration into campaign
LinkedIn Building Outreach Program Template
Start from Scratch Option
- Location: Below template grid
- Function: "Create a custom workflow using our drag-and-drop builder"
- Behavior: Redirects to Campaign Workflow Builder with blank canvas
- State Management: Saves current campaign progress before redirect
Campaign Workflow Builder (Accessed from Workflow Tab or Start from Scratch)
Top Navigation Bar
- Campaign Workflow Builder: Title/brand identifier
- Templates Button: Returns to template selection
- Workflow Button: Current active section (highlighted)
- My Workflows Button: Access to saved workflows
- Dark Mode Toggle: Interface theme switcher
- Save Workflow Button: Saves current workflow configuration
Workflow Canvas
- Function: Main workspace for building campaign workflows
- Drag-and-Drop: Accepts nodes from sidebar
- Connection Lines: Visual connectors between workflow nodes
- Zoom Controls: Plus, minus, and fit-to-screen controls at bottom right
Workflow Nodes Sidebar
Triggers Section
Channels Section
- Send Email: Email communication channel
- LinkedIn: LinkedIn message/connection channel
Conditions Section
- Email Opened?: Decision point based on email engagement
- Link Clicked?: Decision point based on link interaction
- LinkedIn Connected?: Decision point based on LinkedIn connection status
Canvas Tools
My Workflows Section
Saved Workflow Display
- Workflow Name: "linkedin" (user-defined name)
- Creation Date: "Aug 31, 2025, 03:51 AM" timestamp format
- Workflow Stats: "1 nodes, 0 connections" configuration summary
- Load Button: Purple button to import workflow into current campaign
- Delete Icon: Removes workflow from saved list
Success Notification
- Message: "Workflow 'linkedin' saved successfully"
- Display: Green success banner at bottom right
- Duration: Auto-dismisses after 5 seconds
- Positioning: Fixed position, non-blocking
Step 5: Schedule Configuration
Campaign Timeline & Budget Section
Start Date Field
- Field Type: Date picker input, required field
- Format: "dd mmm yyyy" (e.g., "01 Jan 2025")
- Validation: Cannot be in the past, must be before end date
- Default Value: Current date + 1 day
- Calendar Widget: Click triggers date selection popup
End Date Field
- Field Type: Date picker input, required field
- Format: "dd mmm yyyy" (e.g., "01 Feb 2025")
- Validation: Must be after start date, minimum 1 day campaign duration
- Calendar Widget: Click triggers date selection popup
- Dependency: Minimum date is start date + 1 day
Campaign Budget Field
- Field Type: Currency input, required field
- Format: Dollar sign prefix with numeric input
- Validation: Must be positive number, accepts decimals
- Help Text: "Include costs for email sending, design, content, and promotional offers"
Frequency Information
- Display: "Often scheduled around marketing campaigns or seasons"
- Function: Informational guidance text
- Context: Provides best practice timing recommendations
Timezone & Schedule Section
Campaign Timezone Dropdown
- Field Type: Single-select dropdown, required field
- Default Value: "UTC (Coordinated Universal Time)"
- Options: All standard timezone options available
- Help Text: "All campaign timing will be based on this timezone"
Max Emails Per Hour Field
- Field Type: Numeric input, required field
- Default Value: 1000
- Validation: Must be positive integer between 1-10000
- Help Text: "Limit emails to avoid overwhelming recipients"
Enable Optimal Send Times Checkbox
- Field Type: Checkbox, optional
- Function: "Send emails when your audience is most engaged"
- Behavior: When checked, enables AI-powered send time optimization
- Default State: Unchecked
AI-Powered Send Time Optimization Checkbox
- Field Type: Checkbox, optional
- Dependency: Only available when "Enable Optimal Send Times" is checked
- Function: "Use system recommendations for best send times"
- Background Color: Light purple highlighting when enabled
Exclude Weekdays Section
- Function: "Select days when emails should NOT be sent"
- Multiple Selection: Checkboxes for each day of week
Individual Day Checkboxes
- Monday: Checkbox for Monday exclusion
- Tuesday: Checkbox for Tuesday exclusion
- Wednesday: Checkbox for Wednesday exclusion
- Thursday: Checkbox for Thursday exclusion
- Friday: Checkbox for Friday exclusion
- Saturday: Checkbox for Saturday exclusion
- Sunday: Checkbox for Sunday exclusion
Additional Options Note
- Text: "Email sometime when audience is less likely to engage"
- Function: Informational guidance for weekend exclusions
Email Configuration & Send Control Section
Sending Email Addresses Dropdown
- Field Type: Single-select dropdown, required field
- Sample Option: "noreply@company.com"
- Secondary Option: Available in dropdown
- Validation: Must be verified email address in system
- Help Text: "Configure email address to attribute sending load"
Add Email Button
- Function: Adds additional email address to sending pool
- Behavior: Opens email address configuration dialog
- Validation: New addresses must be verified before use
Email Address Type Dropdown
- Options: "Primary" and "Secondary"
- Function: Determines sending priority and reputation management
- Default: "Primary" for main sending address
Enable Send Throttling Checkbox
- Function: "Control rate to avoid spam filters"
- Default State: Unchecked
- Behavior: When enabled, spreads email delivery over time
- Background Color: Light green highlighting when enabled
Navigation Buttons
Previous Button
- Function: Returns to Step 4 (Content Configuration)
- State Management: Saves all schedule configuration as draft
- Validation: No validation required for backward navigation
Next Button
- Function: Proceeds to Step 6 (Review)
- Validation Requirements:
- Start Date must be valid and not in past
- End Date must be after start date
- Campaign Budget must be positive number
- Timezone must be selected
- Max Emails Per Hour must be valid number
- Sending Email Address must be selected
- Error Handling: Shows specific error messages for each invalid field
Step 6: Review & Launch
Campaign Intent Section
- Goal Display: Shows selected goal from Step 1
- Example: "Launch a new product or feature"
- Function: Allows user to verify campaign objective alignment
- Edit Option: Clicking navigates back to Step 1 for modification
Campaign Overview Section
Name Field
- Display: Shows entered campaign name or "Untitled Campaign" if empty
- Source: Pulls from Step 2 campaign name field
- Edit Behavior: Click to navigate back to Step 2
Type Field
- Display: Shows selected campaign type (e.g., "Promotional")
- Source: Pulls from Step 2 campaign type selection
- Edit Behavior: Click to navigate back to Step 2
Funnel Target Field
- Display: Shows selected funnel stage (e.g., "Not Selected")
- Source: Pulls from Step 2 funnel target selection
- Edit Behavior: Click to navigate back to Step 2
Description Field
- Display: Shows campaign description or "No description"
- Source: Pulls from Step 2 description field
- Character Limit: Displays truncated version if over display limit
- Edit Behavior: Click to navigate back to Step 2
Target Audience Section
Segments Field
- Display: Shows "0 selected" or list of selected segment names
- Source: Pulls from Step 3 audience selection
- Format: Comma-separated list when multiple segments selected
- Edit Behavior: Click to navigate back to Step 3
Total Contacts Field
- Display: Shows total contact count with status indicator
- Status Icons: Green checkmark for valid count, warning for issues
- Minimum Validation: Shows error if less than required minimum
- Source: Real-time calculation from selected segments
Workflow Configuration Section
Workflow Nodes Field
- Display: Shows "0 nodes" or actual node count from selected workflow
- Source: Pulls from Step 4 template/workflow selection
- Format: "X nodes" where X is the count
Workflow Paths Field
- Display: Shows "0 connections" or connection count
- Source: Pulls from workflow configuration
- Format: "X connections" where X is the count
Configuration Warning
- Message: "No workflow configured. Your campaign will use basic email sending"
- Display Condition: Shows when no workflow/template is selected
- Warning Icon: Orange warning indicator
- Action: Provides link to return to Step 4
Schedule & Budget Section
Start Date Field
- Display: Shows selected start date or "Not Set"
- Format: "MMM DD, YYYY" format
- Source: Pulls from Step 5 schedule configuration
- Edit Behavior: Click to navigate back to Step 5
End Date Field
- Display: Shows selected end date or "Not Set"
- Format: "MMM DD, YYYY" format
- Source: Pulls from Step 5 schedule configuration
- Edit Behavior: Click to navigate back to Step 5
Budget Field
- Display: Shows budget amount or "$0"
- Format: Currency format with dollar sign
- Source: Pulls from Step 5 budget field
- Edit Behavior: Click to navigate back to Step 5
Timezone Field
- Display: Shows selected timezone abbreviation (e.g., "UTC")
- Source: Pulls from Step 5 timezone selection
- Edit Behavior: Click to navigate back to Step 5
Sending Email Field
- Display: Shows selected sending email address
- Source: Pulls from Step 5 email configuration
- Format: Full email address display
- Edit Behavior: Click to navigate back to Step 5
Final Validation Rules
- Campaign Name: Must not be empty
- Goal Selection: Must have valid goal selected
- Audience: Must have at least one segment with minimum contact count
- Schedule: Start and end dates must be valid
- Budget: Must be positive number
- Email: Must have verified sending address
Navigation Buttons
Previous Button
- Function: Returns to Step 5 (Schedule Configuration)
- State Management: No data changes, purely navigational
- Availability: Always available regardless of validation status
Create Campaign Button
- Function: Finalizes and launches campaign
- Validation: Runs complete validation check on all steps
- Success Behavior: Creates campaign, shows success message, redirects to campaigns list
- Error Behavior: Highlights validation errors, prevents campaign creation
- Loading State: Shows loading spinner during campaign creation process
- Color: Green background indicating primary action
8. Sample Data
Campaign Goals:
- Launch a new product or feature
- Nurture leads and prospects
- Retain existing customers
- Promote an event or webinar
- Share valuable content
- Something else
Audience Segments:
- Enterprise Prospects: 245 contacts, North America
- Newsletter Subscribers: 1250 contacts, Global
- Event Attendees: 89 contacts, Europe
- Product Trial Users: 156 contacts, Asia Pacific
Campaign Templates:
- Cold Email Campaign for Sales: 5 nodes
- Simple B2B Sales Funnel: 12 nodes
- Lead Nurturing Series: 10 nodes
- Webinar Promotion: 15 nodes
- Product Launch: 16 nodes
- LinkedIn Building Outreach Program: 14 nodes
Workflow Nodes:
Schedule Configuration:
- Start Date: Current date + 1 day
- End Date: Start date + 30 days
- Budget: $5000
- Timezone: UTC
- Max Emails Per Hour: 1000
- Exclude: Monday, Saturday, Sunday
9. Acceptance Criteria
- The system must display campaign goal selection with 6 predefined options on the first step
- The system must provide guided navigation with 5 distinct steps (Campaign Type, Audience, Content, Schedule, Review)
- The system must calculate and display real-time audience count when segments are selected
- The system must show geographical distribution visualization after audience segment selection
- The system must provide pre-built templates categorized by campaign type and business function
- The system must allow custom workflow creation using drag-and-drop interface
- The system must validate campaign configuration before allowing launch
- The system must save campaign progress automatically as users navigate between steps
- The system must display workflow preview with node count for all templates
- The system must enforce minimum audience size of 10 contacts before proceeding
- The system must provide timezone-aware scheduling with date picker controls
- The system must allow email configuration with verified sender addresses
- The system must display comprehensive review summary before campaign launch
- The system must support campaign saving as draft with timestamp tracking
- The system must provide "Back to Campaigns" navigation from any step
- The system must display progress indicators with completion status for each step
- The system must enforce required field validation (name, goal, audience, schedule)
- The system must provide template filtering and search capabilities
- The system must allow workflow modification and custom node configuration
- The system must display success confirmation upon campaign creation
10. Process Changes
Current Process | New Process | Impact Analysis |
|---|---|---|
Manual campaign setup with disconnected tools | Guided 5-step workflow with integrated tools | Reduces campaign setup time by 60% and eliminates configuration errors |
Audience selection without size visibility | Real-time audience calculation with geographical distribution | Improves targeting accuracy by 40% and reduces audience estimation errors |
Custom workflow creation from scratch | Template-based workflow with customization options | Decreases workflow creation time by 75% and ensures best practice implementation |
Manual schedule configuration across multiple systems | Integrated scheduling with timezone and optimization features | Reduces scheduling errors by 80% and improves delivery timing optimization |
Ad-hoc campaign review process | Standardized validation and review dashboard | Increases campaign launch success rate by 50% and reduces post-launch issues |
Siloed template management | Centralized template library with categorization | Improves template reusability by 90% and reduces campaign creation time |
Limited workflow visualization | Visual workflow builder with drag-and-drop functionality | Increases workflow understanding by 70% and reduces configuration complexity |
11. Impact from Solving This Problem
Metric | Improvement |
|---|---|
Campaign Setup Time | 60% reduction from 4 hours to 1.5 hours average |
Configuration Errors | 80% reduction in campaign launch failures due to setup issues |
Template Reusability | 90% increase in template usage across campaigns |
Time to Market | 50% faster campaign launch from concept to execution |
User Productivity | 40% improvement in marketing team efficiency |
Campaign Success Rate | 35% increase in campaign performance due to better targeting |
Training Time | 70% reduction in new user onboarding time |
Process Standardization | 100% compliance with campaign creation best practices |
Workflow Creation Speed | 75% faster custom workflow development |
Audience Targeting Accuracy | 45% improvement in segment selection precision |
12. User Behavior Tracking
Marketing Manager Tracking:
Event | Properties | Metrics | Questions Answered |
|---|---|---|---|
| goal_type, user_id, timestamp | Goal selection frequency, popular goals | Which campaign goals are most commonly selected? |
| segment_id, contact_count, geography | Audience targeting patterns | What audience sizes and locations are typically targeted? |
| template_id, category, node_count | Template engagement | Which templates are most frequently viewed and selected? |
| validation_errors, time_spent | Review thoroughness | How long do users spend reviewing campaigns and what errors occur? |
| goal_type, audience_size, template_used | Launch success patterns | What combination of factors leads to successful campaign launches? |
Campaign Specialist Tracking:
Event | Properties | Metrics | Questions Answered |
|---|---|---|---|
| user_id, timestamp, custom_vs_template | Builder usage patterns | How often do specialists create custom workflows vs. using templates? |
| node_type, position, workflow_id | Workflow complexity trends | What types of workflow components are most commonly used? |
| template_id, modifications_made, save_success | Customization patterns | How frequently are templates modified and what changes are made? |
| timezone, frequency, exclusions | Scheduling preferences | What scheduling patterns are most effective for different campaign types? |
| completion_percentage, time_spent | Draft management | At what point do users typically save campaigns as drafts? |
Key Questions These Events Answer:
- What campaign goals drive the highest engagement and conversion rates?
- Which audience segments and sizes correlate with campaign success?
- What template categories and workflow complexity levels perform best?
- How can we optimize the campaign creation flow to reduce abandonment?
- What scheduling and timing patterns lead to optimal campaign performance?
- Which workflow nodes and combinations drive the best results?
- How can we improve template usage and customization capabilities?
Link - https://preview--crmcopy1.lovable.app/contacts
No Comments